Showing posts with label Educational. Show all posts

Wednesday, September 29, 2021

Squid Game: "Invitation Card"

 Innocent kids games get deadly in this Korean drama series #1


Netflix #1 show from Monday is a Korean drama with a strange name, "Squid Game" released on September 17, is a nine-episode series about the world where children's games are getting lethal. Squid Game is the first Korean drama to hit number one on Netflix, hitting that milestone just four days after it's premiere. This is bloody and brutal, but addictive at the same time. Here's what you need to know about this popular program.

Warning: There are little spoilers ahead, although I will only explain the basics of the show and not who is gonna live and die.

About Squid Game

Squid game focuses on a group of desperately indebted people in South Korea. At first, they are lured into a deadly children's play, but then many of them decided to return as volunteers realizing that the games might be their only chance to win the money they need to survive. We are talking about big money here, 45 billion South Korean Won, which is equivalent to 38 milliom US dollar. But the chances of survival is quite small. Think of this as the movie "The Hunger Games" only with the competition like red light, green light and marbles.

Should you watch Squid Game?

Without a doubt, the series has a dark and bloody splatery theme. Watching children's games turn into deadly battles is puzzling and not for everyone. But the characters are well-developed and the actions move fast and never goes away for long. The main character, Seong Gihun is a desperate father who is easy to get excited but not perfect. There is a heart breaking episode where his actions result in a heinous death. Other participants  include an elderly man who becomes the group's grandfather, a North Korean defector, a gangster with a snake tattoo on his face and a highly educated man who has been the pride of his hometown but fails short of his potential. Characters are introduced quickly and smoothly and then it begins. Once you've seen an episode, its quite hard not to go back, even if all you want to do is to see who survives the next twisted game.

Squid Game "Invitation Card"

If you already watched the series, you probably aware of this invitation card. Which draws attention to  everyone who sees it. It is a business card with three distinct shapes on it. Circle, Triangle, and Square. If you receive this card and dial the number, you're in the game.


Due to the fact that this is really popular and I fancy to have this invitation card, I tried to replicate it using my limited editing skills. And for some reason, I think I did a great job.


I place it in a document file and resize the image to the standard business card size. (5.08cm x 8.89cm) And it is now ready to print. 


Have fun. 

Here's the link where you can download the image and use it on your own personal interest. I didn't put any watermark whatsoever on the image. If you want to share it to anyone, make sure to give me some proper credit. Enjoy! 


Monday, June 21, 2021

Thursday, March 18, 2021

Tuesday, March 24, 2020

RUNTASTIC: Stay Home, Stay Fit, Stay Connected

Together we are strong. Here are 260+ FREE HOME WORKOUTS to make us even stronger.


Dear everyone,

As the world collectively transitions to life indoors to help flatten the curve of COVID-19 (thank you for doing your part!), we at Adidas Runtastic have been asking ourselves how we can do more to help you stay healthy, both physically and mentally during this challenging period. Now, more than ever, staying connected and keeping active is important for your overall health and happiness.

Starting today, we are providing 90 days of FREE ACCESS TO OUR FULL SUITE of
260+ home workout videos and training plans in all 15 available languages. With FREE ACCESS to a Premium Membership, you can watch hundreds of how-to-videos, work out at home with no equipment required, and choose from a variety of training plans built for all levels - from beginner to experienced athletes. You can also connect with a community of millions of active users to find inspiration and motivation while you get your daily dose of fitness. Work out with your kids, your pets, or on video chat with your best friend..just keep moving!


If you know of anyone who could benefit from this during this time of need, please forward, share or post this message. Let's take care of each other, stay home, and through sports, we will come out of this stronger than ever.
#HomeTeam #StayHomeStayFit

GET FIT WITH PREMIUM

---

JOIN THE FIT FROM HOME CHALLENGE


Together we can prove that the walls may keep us in, but they can't stop us from exercising our passion for a fit and healthy lifestyle.

JOIN CHALLENGE


---

FULL-BODY HOME WORKOUT


In the current situation, self-care is important. Here's a full-body workout to help you de-stress that you can do from the comfort of your living room.

START WORKOUT

Thursday, March 5, 2020

4-7-8 Breathing Technique for Better Sleep

Nahihirapan ka rin bang makatulog sa gabi? Kahit na gaanong pagod mo sa buong maghapon ay nahihirapan ka pa ring dapuan ng antok? Sa article na ito ay ibabahagi ko sa inyo ang isang paraan na nakatulong sa akin paano magkaroon ng magandang tulog. 


Akala ko pangarap na lang para sa mga matatanda ang makatulog ng maayos sa gabi at gigising ng maganda at masigla. Hindi lang naman ikaw ang nakakaranasan nito. Kalahati ng populasyon natin ay nakakaranas ng kakulangan sa tulog. Dala na rin ito ng mga iba't ibang pangyayari sa buhay ng tao.

Wala man tayong kontrol sa mga bagay bagay na 'yan, pwede naman tayo mag-focus sa kung ano ang ating pwedeng kontrolin, which is ang ating paghinga. Kapag nasubukan mong manipulahin at kontrolin ang patterns mo sa paghinga, makakamit mo ang mapayapang kaisipan at katawan. Which is na kailangan natin para makatulog. Ang 4-7-8 breathing technique ay sobrang dali lang at hindi mo na kinakailangan ng kung anu-anong kagamitan maliban sa iyong sarili. 


Simplicity is Key

Ang 4 - 7 - 8 breathing technique ay isang breathing pattern o paraan ng paghinga na na-develop ni Dr. Andrew Weil. Naka-based ito sa isang Ancient yoga technique na tinatawag na Pranayama, na kung saan tinutulang nito na magkarooon ka ng kakayahan na kontrolin ang iyong paghinga. Paano 'yan gawin? Ganito lang:

1. Una, huminga ka ng dahan dahan mula sa iyong ilong sa loob ng  4 na segundo.
(Breathe-in slowly through your nose for 4 seconds)

2. Pangalawa, pigilan ang paghinga sa loob ng 7 segundo.
(Hold your breath for 7 seconds)

3. At pangatlo, Ilabas ang hangin mula sa bibig sa loob ng 8 segundo.
(Exhale through your mouth for 8 seconds)


Then, ulitin mo ito ng 4 hanggang 6 na beses.

Habang ginagawa mo 'yan, i-relaxed ang iyong panga (jaw muscle) at isarado ang bibig habang humuhinga sa ilong. Kapag ilalabas mo na ang hangin, subukang ilabas din ang mga tension na galing sa iyong katawan sa pamamagitan ng pagbuha ng medyo malakas mula sa bibig. At ang  dulo ng iyong dila ay ilagay sa ngala ngala (Roof of your mouth), derekta sa likod ng ngipin. 

Hindi importante kung gaano katagal o kabilis mo s'ya gagawin, make sure lang na nasusundan mo ang 4:7:8 ratio dahil iyon ang mahalaga. Ibig sabihin nito na ang paraan mo ng paghinga ay pwedeng magbago base sa kakayahan mo. Mahalaga rin ang focus. Sobrang ikli lang ng attention span ng isang tao, kaya kapag napapansin mong naglilikot na naman ang utak mo, bumalik ka lang sa 4-7-8 breathing technique. At sa hindi mo na namamalayan, mahimbing ka nang natutulog.


This technique really helps me with my sleeping problems. Every time na gusto kong ma-relax, lagi ko lang ginagawa ang 4-7-8 breathing technique. This is helpful sa mga taong may insomnia at anxiety. Magandang brain exercise s'ya para maiba ang focus ng iyong mind instead of wandering around. I am a person who overthinks a lot kaya ang hirap i-showdown ng brain cells ko minsan. That is why I am really thankful I discovered this breathing technique. If nagiging health-conscious ka na rin tulad ko, or gusto mo lang talaga magkaroon ng magandang tulog, well, maybe it is the time to put away your smartphone before bed, then practice this breathing technique, and get your self a good night sleep. 

Thursday, December 12, 2019

Fixing the AdSense "Earning at Risk" Error Message on Blogger

I was blogging for quite sometimes now and I never encounter any error message on my Google AdSense account until today.

This message saying "Earning at risk - You need to fix some ads.txt file issues to avoid severe impact to your revenue."


It sounds pretty scary, but it's actually really easy to fix. 

In this article, I am going to explain how to fix that error. This tutorial is applicable if you are using the Blogger site.

FIX AdSense Error "You need to fix some ads.txt file issues to avoid severe impact on your revenues"

Just follow these easy steps in fixing this error.

Step 1: Log-in to your Google AdSense account.


Step 2: Look for your Publisher ID.

On your Google AdSense account, you will find your Publisher ID on the Account Tab. Take note of this because you'll need it later. 


Step 3: Log-in to your Blogger dashboard.


Step 4: Click on Setting Menu and look for Search Preferences


Step 5: Monetization: Click Edit.

Then select Yes.


Step 6: Copy and Paste this to the space provided.

google.com, pub-0000000000000000, DIRECT, f08c47fec0942fa0


Just change the pub-0000000000000000 into your own Publisher ID.

Step 7: Click Save Changes.


And that's it! We're finished fixing the error. The message will be gone after 24 hours or more depending on the need of your account. 

I hope this article helps you. Please let me know what do you think on the comment section below. 

Thursday, October 17, 2019

Transfer Files from Android to PC using SHAREiT

Are you bored sending files from your android phone to your computer using USB cables? Or worried that viruses might infect your beloved phones?

There are several ways on how to send files from your phone to your computer without the help of USB cables. And in this article, I will teach you how to send files using WI-FI connection. We can do this with the help of an App called SHAREit.

What is SHAREit?


SHAREit (SHAREit Technology Co. Ltd) is a technology company founded in April 2015. Users can use SHAREit to transfer files including photos, videos, music, contacts, apps, and any other files. SHAREit application allows Windows, Windows Phone, Android, and iOS devices to transfer files directly. 

It works as a peer-to-peer exchange and connects devices through the WI-FI radio to send and receive files. The app can handle most of the users' file-sharing needs: Fast file transfer - Large-sized content sends in seconds. Secure sending - Files are saved directly onto the device, not in the cloud.

Now that you have a brief background about the SHAREit app, I think it is time to use it.

How to send Files using SHAREit Application

Step 1: Download the SHAREit app on your phone and computer. You can download the SHAREit app on Playstore or Appstore. Click this link at www.ushareit.com to download the app for PC.


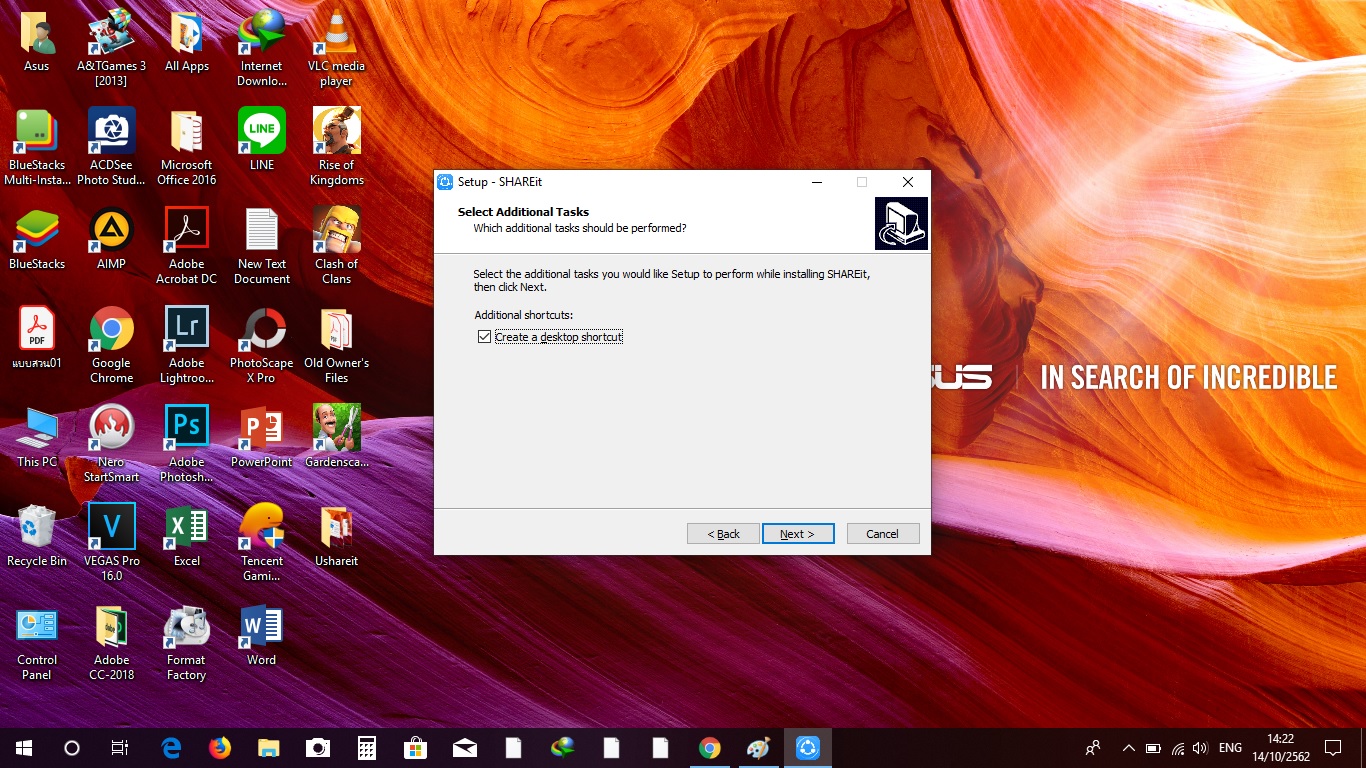
Step 2: After downloading, install the app. Follow the instruction given below on how to install the application on your PC.


Step 3: Next, connect the two devices together by finding the same network. You can choose from the given connection.


You can connect the two devices by scanning this QR-code using the SHAREit app on your phone, or...


by scanning the hotspot of your phone.


Step 4: Finally, look for the files you want to send. Click it or just drop it on the App. 


And there you have it! You can now send files from your Android to your PC or vice versa.

Sunday, September 22, 2019

HARVARD'S POSITIVE PSYCHOLOGY

Did you know that at Harvard, the most popular and successful course teaches you how to learn to be happier? The Positive Psychology class taught by Ben Shahar attracts 1400 students per semester and 20% of Harvard graduates take this elective course.


According to Ben Shahar, the class - which focuses on happiness, self-esteem and motivation - gives students the tools to succeed and the face life with more joy. This 35-year-old teacher, considered by some to be "the happiest guru", highlights in his class...


14 key tips for Improving the Quality of our Personal Status and Contributing to a Positive Life

Tip 1. * Thank God for everything that you have *

Write down 10 things you have in your life that give you happiness. Focus on the good things!

Tip 2. * Practice Physical Activity *

Experts says exercising helps improve mood. 30 minutes of exercise is the best antidote against sadness and stress.

Tip 3. * Breakfast *

Some people miss breakfast for lack of time or not to get fat. Studies show that breakfast gives you energy, helps you think and perform your activities successfully.

Tip 4. * Assertive *

Ask what you want and say what you think. Being assertive helps improve your self-esteem. Being left and remaining silent creates sadness and hopelessness.

Tip 5. * Spend your Money on Experiences *

A study found that 75% of people felt happier when they invested their money in travel, courses and classess; While only the rest said they felt happier when buying things.

Tip 6. * Face your Challenges *

Studies show that the more you postpone something, the more anxiety and tension you generate. Write short weekly list of tasks and complete them.

Tip 7. * Put everywhere nice Memories, Phrases, and Photos of your Love ones *

Fill your fridge, your computer, your desk, your room, YOUR LIFE of beautiful memories.

Tip 8. * Always Greet and be Nice to Other people *

More than 100 inquiries state that just smiling changes the mood.

Tip 9. * Wear comfortable shoes *

If your feet hurt you, you become moody, says Dr. Keinth Wapner, President of the American Orthopedics Association.

Tip 10. * Take care of your Posture *

Walk straight with your shoulder slightly backwards and the front view helps to maintain a good mood.

Tip 11. * Listen to Music * (Praise God)

It is proven that listening to music awakens you to sing, this will make your life happy.

Tip 12. * What you eat has an impact on your mood *

Do not skip meals, eat lightly every 3 to 4 hours and keep glucose levels stable. - Avoid excess white flour and sugar. - Eat everything! Healthy - Vary your food.

Tip 13. * Take care of Yourself and feel Attractive *

70% of people say they feel happier when they think they look good.

Tip 14. * Fervently believe in God *

With Him nothing is impossible! Happiness is like a remote control, we lose it every time, we go crazy looking for it and many times without knowing it, we are sitting on top of it ...

Monday, August 19, 2019

10 Tips and Strategies for Classroom Reporting

Kabado ka ba kapag may Reporting?

Bibigyan kita ng mga strategies when it comes to Reporting. Ang Reporting ay isang Performance-Based Task na madalas ibinibigay sa inyo nang inyong mga guro, instructor o professor. Alam ko na isa ka rin sa mga natatakot at nagdadasal na sana hindi ka mapili o hindi ka mauna sa mag-rereport. Pero s'yempre hindi ka matatawag o matuturing na isang totoong mag-aaral kung hindi mo masusubukan ang mag report sa harap ng iyong mga kaklase. 

Kaya basahin mo lang ito hanggang dulo at at malalaman mo ang iba't ibang strategies and tips pagdating sa class reporting.

What is your most unforgettable moments during your reporting? Write your answer in the comment section down below! 


Kapag sinabi nating Classroom Reporting, ito ay ang pagkakaroon mo ng pagkakataon na tumayo sa harap ng buong klase at magturo na parang isang guro o professor. During this time, maaari kang mag-share nang iyong mga nalalaman, magtanong tungkol sa iyong sinasabi at puwede ka rin nilang tanungin tungkol sa iyong paksa.

Binibigay ito ng inyong guro hindi dahil sa tinatamad sila, ito ay upang ma-assess o masukat kayo sa mga iba't-ibang aspeto ng karunungan na mayroon kayo. Isang halimbawa nalang n'yan ay ang Communication Skill mo. Kung paano ka magsalita sa harapan ng maraming tao. Masusukat rin dito ang iyong Confidence o kalakasan ng loob. 

10 bagay na dapat mong gawin BEFORE and DURING Classroom Reporting

Step 1: Set your Motivation

Ang una mong gagawin ay mag set ng motivation para sa iyong mga audience which in this case, is your classmates. Bago ka mag-proceed sa iyong lesson proper, you should atleast prepare some ice breaker, or attention getter na magagawa mo in just a limited time. Sa tulong nito ay maise-set mo ang mood ng classroom and you'll get the attention of your classmates to listen at maiwasan ang pagkaburyo sa iyong reporting. Halimbawa nito ay Games, video clips, songs, puzzle, riddle, etc.) It is up to you and it'll depende on your subject matter. Make sure lang na naka incline ito sa iyong paksa.

Step 2: Do some Research

Once your teacher gave you your topic for your report, mag research ka bes! Mahalaga na magkalap ka ng maraming impormasyon tungkol sa iyong paksa. Don't stick on textbooks itself. Kung sa book nanggaling ang iyong paksa, huwag ka lang aasa don at 'yun lang ang gagamitin mo. Find some reliable references. Go to the library and find other books or ask Mr. Google but be careful sa paggamit ng Internet, not all information there are valid.. And remember your role, "Teach them and share new knowledge"

Step 3: Prepare Visual Aids

After you gathered and collected all the information you need para sa iyong paksa, of course you need a way paano ito maipapakita sa iyong mga kaklase. You have 2 choices, one is gumamit ng Manila Paper or Cartolina. Kailangan mong isulat dito ang mga information nakalap mo. Pero hindi kailangan lahat, 'yung mga mahahalaga lang tungkol sa iyong paksa. And if you're going to use this way, you need to write a little bigger. Bigger enough para makita ng mga kaklase mo sa dulo. The second one is using a PowerPoint. Mas attractive itong gamitin dahil pwede mong gamitin both texts and pictures to convey the information. Pero huwag naman i-spam o ilagay lahat ng info sa iisang slide. Free lang naman ang slide so you can divide the info into different slides. Maximum of 3 sentences per slide. And each sentences is consists of 6 words. Sapat na 'yun.

Step 4: Avoid to much Memorization

DON'T MEMORIZE YOUR WHOLE REPORT WORD BY WORD. Hindi mo kailangang kabisaduhin iyon. Maipapahamak mo lang ang iyong sarili kapag ikaw ay nilamon na ng kaba sa harap at magmistulang istatwa na hindi na alam kung ano ang sasabihin. And to avoid that, the best thing that you can do in here is to FULLY MASTER YOUR TOPIC. Learn the content of your lesson. Hindi mo kailangang kabisaduhin, you just need to FAMILIARIZE on the most important details. Na kahit balik-baliktarin pa 'yan, you can answer them at ease. Memorization isn't bad, though. Mahalaga pa rin naman ito sa iyong reporting. Kasi minsan si teacher ay terror, hindi nag a-allowed ng cue-card o guide sa reporter sa harap during reporting. 

Step 5: PRACTICE! PRACTICE! PRACTICE!

Mahalaga na lagi kang handa sa kahit anong oras at pagkakataon. Hindi mo alam kung ano ang mga maaaring mangyari sa araw ng iyong reporting. Kapag ikaw ay nag-practice hindi lang nito mahahasa ang iyong kaalaman tungkol sa iyong paksa kundi matutulungan ka rin nito na alamin ang buong daloy ng iyong report. Kung saan ka magsisimula, paano ka magtatanong, at kailan ka matatapos. 

Step 6: Engage with your Audience

You need to set an interaction between you as a reporter, and your classmates and teacher. Mahalaga na sa bawat reporting, hindi lang ikaw 'yung nagsasalita. Your classmates should atleast participate. Masusukat mo dito ang interest nila sa topic. You can ask question or you let them ask you questions.
REMEMBER: Don't let your Audience read your report for you. Huwag mo silang pagbasahin. Akala mo kasi nakukuha mo ang kanilang attention kapag pinababasa mo sila. For me as a teacher, this is a BIG-OFF sa iyong performance. Hindi kasi s'ya magandang tignan.

Step 7: Reward System

You ask question and your classmates got it right, you give them some reward. Makakatulong ito sa'yo to gain your audience interest. Once kasi na nalaman nilang nagbibigay ka ng reward, namo-motivate sila to participate on your discussion. Just make sure to do this with consistency. Hindi 'yung nag-reward ka lang sa umpisa tapos sa dulo wala na. You should atleast divide it sa buong duration ng report mo. 

Step 8: Provide Handouts

Sa paggamit ng Handouts, makakatulong ito sa iyo at sa iyong mga kaklase. Especially sa mga kaklase mong hindi makopya ang lecture mo dahil sobrang liit ng sulat mo o kaya sadyang tamad lang silang magsulat. Hindi na mahahati ang attention nila sa pagsusulat at pakikinig. 

Step 9: Speak Louder

Start your report with a loud voice. Nagpapakita kasi ito ng katalinuhan. Sa tulong nang pagsasalita ng malakas, napapalakas din nito ang iyong kalooban at talagang mapapasabi nalang si teacher na magaling ka. 

Step 10: Just Relax

Huwag na huwag magsisimula kung sobrang kinakabahan. Maaaring magdulot ito ng hindi maganda sa'yong report. Kalmahin ang iyong sarili. Shake it off. Wala kang dapat ikatakot. Just give your best and enjoy your moment.

Ayun na 'yon! Sana may natutunan ka sa article na ito. Kung may kakilala ka na magre-report sa susunod na araw o sa susunod na Linggo, ibahagi mo na sa kanya ito!

Wednesday, November 7, 2018

Paano Makapasa sa Immigration

These are my tips kung paano pumasa sa Philippine Immigration. In this blog, ico-cover lang natin 'yung immigration tips para sa travel for leisure. So if travel for anything else and purpose mo, I am not sure if this blog will be super helpful to you. SO let's get into it.


Related image

First thing first, bakit ba may Immigration?

Sa lahat ng bansa ay may immigration because this is for the security purposes para namo-monitor ng isang bansa kung sino ang naglalabas-pasok sa bansa nila. 


Ano ba ang mga requirements para makapag-travel ka sa ibang bansa? 

1. Philippine Passport

Your passport should be in a good condition and should be valid at least 6 months after your return. 

Related image

2. Visa (If required)

There are some countries na nagre-required ng visa, for example Japan, Korea, US, countries in Europe. Kailangan mo munang i-check ang pupuntahan mong bansa kung kailangan ba ng visa. 

Image result for Travel Visa

3. Printed Rountdrip Tickets

Personally, I advice na i-print ang tickets mo kasi minsan kapag nasa phone mo lang at naka screenshot hindi maiiwasan na mataranta kana kapag tinatanong ka na nung Immigration Officer. Minsa nakakakaba tapos mayroong mga Immigration Officer na very traditional, mas prefer nila ang printed. This I was experienced a lot of times, laging nasa phone ko lang ang itinerary tickets ko tapos lagi talaga akong napapagalitan. From then on lagi na akong nagpi-print ng itinerary ticket ko.

Image result for cebu pacific round trip ticket 

4. Pen

This is not actually a requirement but if you are travelling from NAIA, magdala ka ng ball-pen kasi walang ball-pen 'don dahil kailangan mong mag-fill-up ng mga Immigration slips. Walang ball-pen sa NAIA. 

NOTE: Minsan ang roundtrip tickets ay hindi enough sa Immigration Officer para ipasa ka sa interview, kaya I suggest you also bring the following:

Helpful Documents

I advice that all your documents should be printed para mas madaling maghanap. And if marami kayo sa group kailangan lahat din kayo mayroong copy. 

Hotel Booking

Dapat sa hotel booking nandoon syempre ang name ng hotel, address ng hotel at contact number of the hotel. Kung hindi ka naman magho-hotel or mag-e-AirBNB, kailangan alam mo 'yung pangalang ng pupuntahan mo o 'yung pag-stay-an mo, 'yung pangalan ng lugar ng pag-stay-an mo, at contact number ng contact person mo. 

Image result for hotel booking confirmation

Reasonable Show Money

For the show money, I usually prepare 400 to 600 USD at syempre depende naman ito sa bansang pupuntahan mo. Mamaya, pupunta ka pala ng Europe tapos 'yun lang ang dala mo medyo sketchy 'yun diba? Pero kung Asia lang naman tapos 1 week usually ang trip mo, I think enough na 'yung 400 to 600 USD na show money pero syempre tipid lang tayo sa pag-travel, hindi ko naman lahat 'yun nagagastos. For show money lang talaga. Ito minsan ang show money ay hindi rin talaga enough. So kailangan mo ng..

Related image

Secondary Proof of Financial Capacity

This includes latest copy of your bank certificate. Also, pwede ka magpakita ng credit cards/debit cards.
Image result for bank certificate

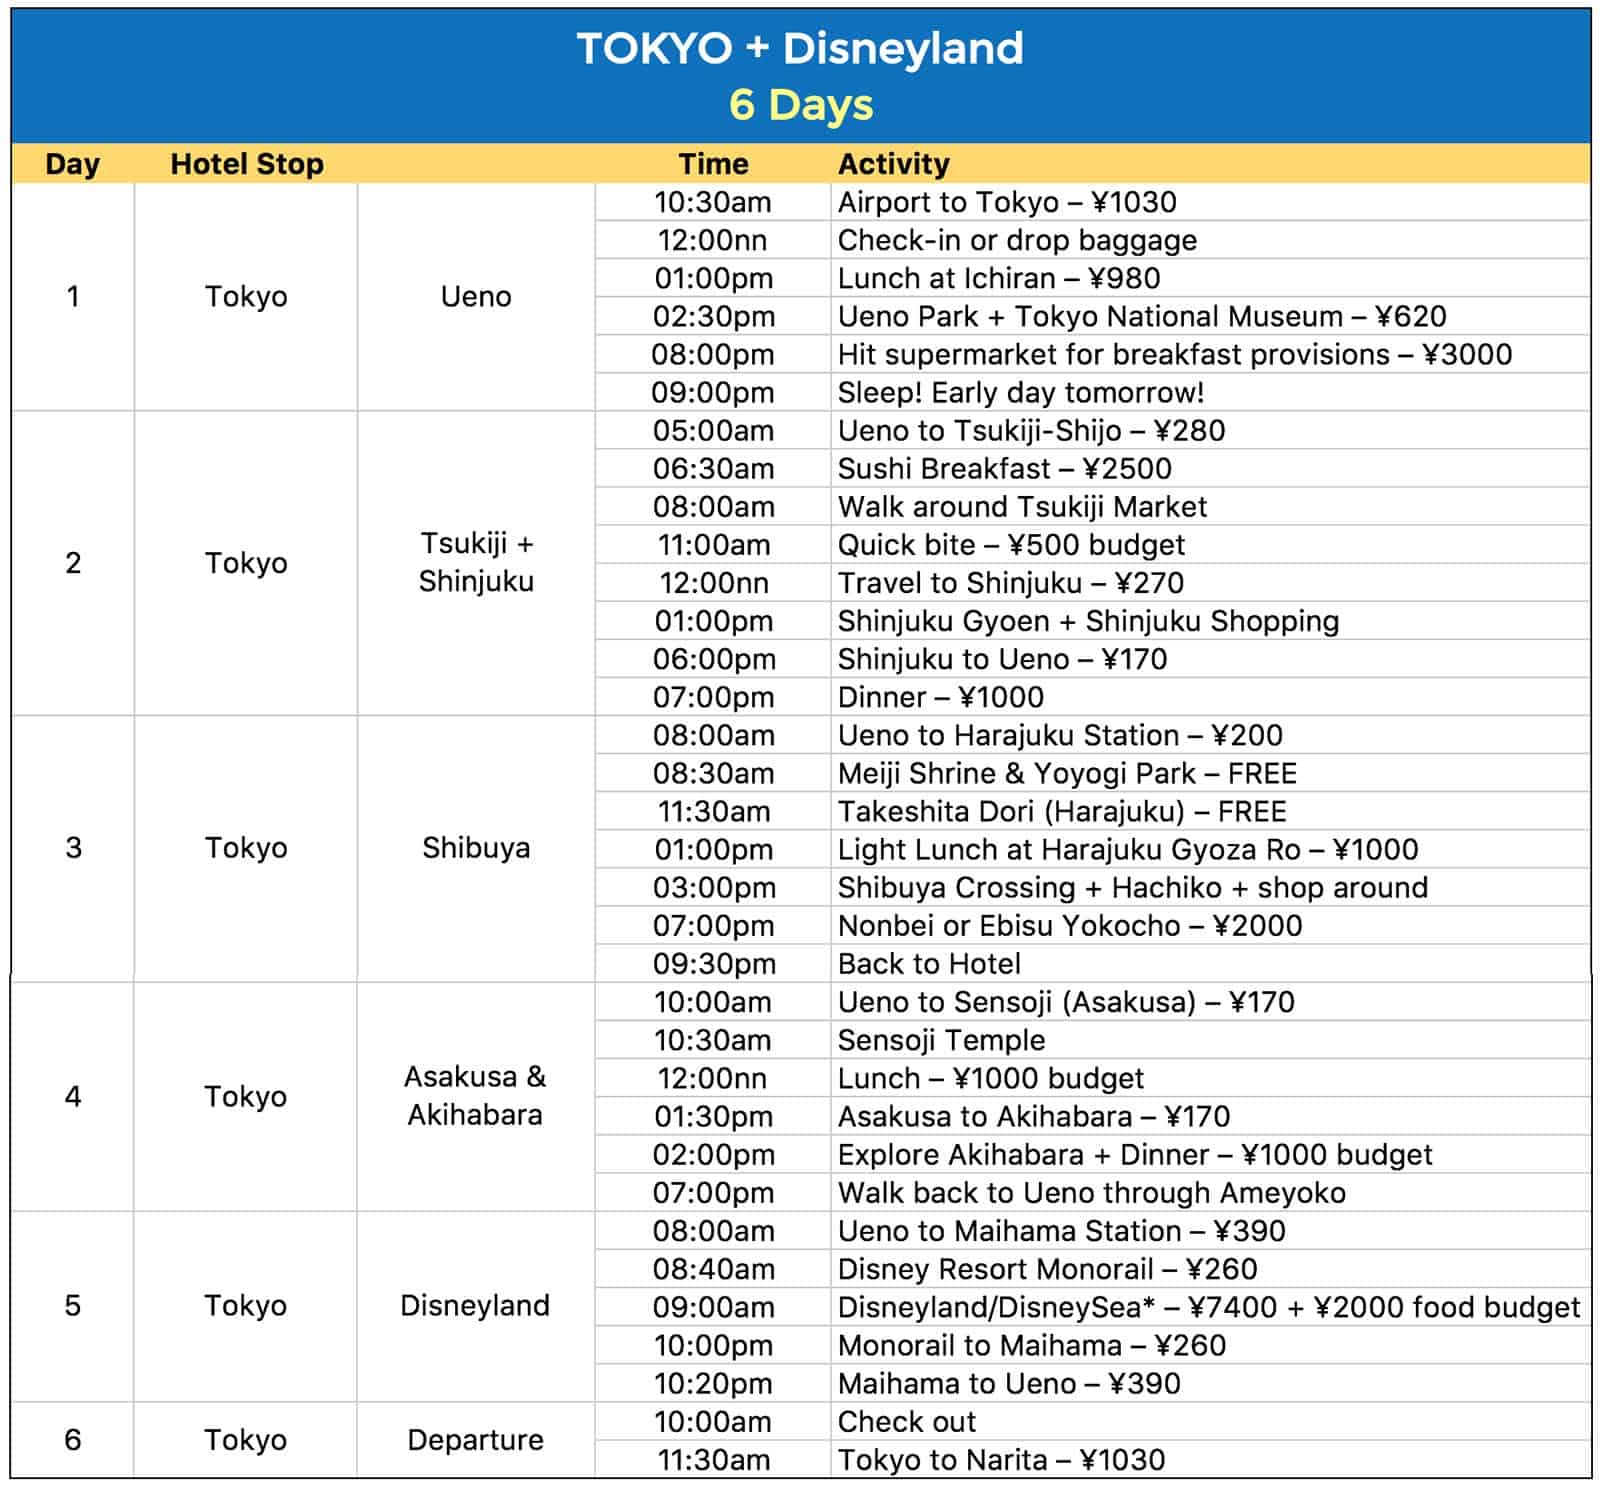
Travel Itinerary

It is also safe to bring your detailed travel itinerary. Kapag mayroon na kayong listahan kung saan kayo pupunta, like day 1, day 2, day 3 etc.

Image result for day travel itinerary template

Park Tickets, Vouchers

And kung mayroon kang mga reservation like park tickets, o kahit voucher. 'Yung mga nandun na dated nung time ng travel mo or within your time of travel, pwede mo ring dalhin 'yun to proof na pupunta ka lang talaga doon para maggala. 

Additional Requirements for Different Types of People.

Enrolled Students

One, f you are a student and you're enrolled, please bring a copy of your registration form.

Student but not yet Enrolled

If you are a student and you are not yet enrolled pero mage-enroll ka palang, bring your current ID, siguro a proof of the date of your enrollment.

Employed - Private Sector

You should bring your company ID, a copy of Certificate of Employment, and also a copy of your approved leave letter. Pero kung tatakas ka lang, wala ka naman talaga nito, so wala ka maipapakita. Okay lang naman din 'yun. 

Employed - Government

If you are employed in the government, bring your company ID, a copy of your Certificate of Employment and also leave notice. Parang may special na leave letter for government employee na hindi ka talaga palalabasin ng bansa o may sobrang liit na chance na palabasin ka ng Pilipinas kung wala ka nang leave of notice.

Currently Looking for Job

If you are currently looking for job, I think mag dala ka na lang din ng job offer, or 'yung mga scheduled interview.

Business Owner

If you are a Business owner, a copy of your Business Permit or your Mayor's Permit and also a copy of your Business Registration which is SEC, DTI or BIR

Traveling with Minor but NOT your Children

If you are travelling with minor which is not your children, halimbawa Tito ka lang tapos isasama mo ang mga pamangkin mo, kailangan mo ng DSWD Travel Clearance.

NOTEMake sure that all of your document/s is/are legit. 

TIPS during Immigration

Ito 'yung mga tips kapag nandoon ka na sa Immigration Booth Line

1. Dress Smart

Hindi naman kailangan na super suite and tie ganyan. Pero you should dress appropriately. Hindi puwede 'yung parang nakapambahay ka lang. 

2. Relax

Alam ko mahirap mag-relax sa mga panahong ganito kahit na alam mo namang wala kang gagawing masama pero kinakabahan ka. RELAX! Inhale.. Exhale..

3. Take out your Passport from the Cover

Sa Immigration hindi nila kinukuha ang Passport cover o gusto nila Passport mo lang alone 'yung nandon together with your boarding pass and immigration slip. Mayroon akong kilala na silang barkada na nagtravel. Tapos 'yung isa hindi nakasama dahil 'nung tinatanggal n'ya 'yung passport doon sa cover. nasira 'yung front cover ng passport. So kapag hindi good condition ulit ang inyong passport, I doubt na payagan kayo. Please check your passport!

4. Be Polite

Huwag mo namang masyadong taasan ng boses o kalabanin 'yung Immigration Officer.

5. Do Not Panic

6. Be Confident

Be confident in all of your answers. 

7. Be Honest

Be honest in answering all of the questions of the Immigration Officer. 

Usual Questions Asked by the Immigration Officer

1. Saan ka Pupunta?

2. Sinong kasama mo?


3. Anong gagawin n'yo 'don?

4. Gaano kayo katagal 'don? and

5. Kailan ka babalik?

These are the questions na dapat super prepared ka na hindi mo kailangang tignan-tignan sa itinerary mo. Though, okay lang naman pero syempre at least this way medyo very detailed ka, alam mo kung kailan ka babalik. Ang sobrang importante lang naman sa kanila is kung ano ang gagawin mo doon at kailan ka babalik. 


SO, these are my tips kung paano ka papasa sa Immigration kung ang purpose of your travel is for leisure o mag gagala ka lang. 

Kung may alam ka pang Immigration tips para sa ating mga kababayan, please leave it in the comment section down below. If you like the content of this blog, please do share it to your friends!

Saturday, September 29, 2018

How to send files in Messenger through Mobile Phone

Sending files online is very necessary to all of us. Sending important files to your boss, or sharing your homework and activity to your friends and submitting your projects to your professors. We can send it through emails and other platforms through the use of our computers. But not all of us have the access to computers and we're just depending to our beloved smartphones.
Although we can send files through emails with our phone but it is not the best way to send files, you need to ask your friend's email before sending the files. Not like the Messenger App which is very accessible as per all people are connected to Facebook 24/7. You can reach your friend just a few taps on your phone. But the app itself is very limited to messages, photos, and videos. You can't send files directly to the app. You need to send it through the Facebook site on web and that's a hassle if you don't have any computer or laptop to use.

That's why I'm here today to show you on how to send files in Messenger through the use of your smartphone. All you need is an Internet connection/Mobile data, your phone and the file/s you need to send. Are you ready?

1. Open your phone's Browser. 

In this case, I am using Google Chrome browser.

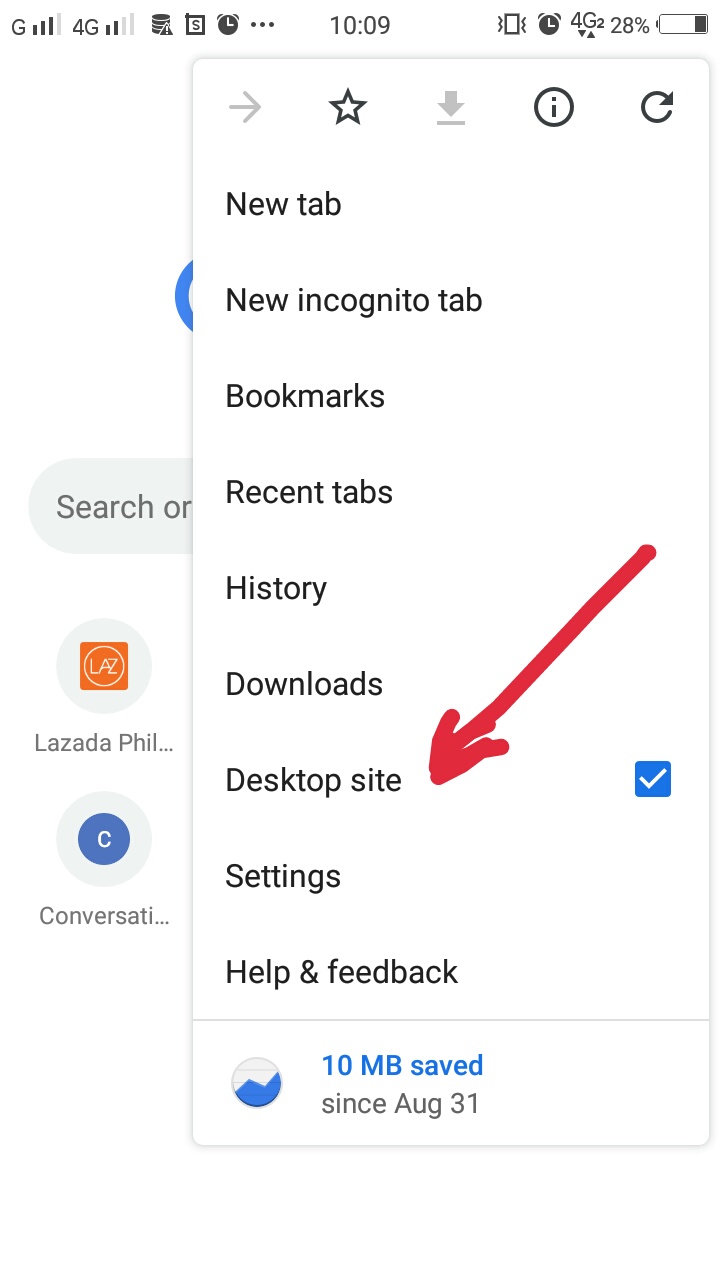
2. Click the 3 vertical dots on the upper right corner

It will be different depending on the browser you are using.. 

3. Tick the view as Desktop site. 

This option will turn your searches as if you are using a computer. Quite fantastic.. 

4. On the Address Bar, search for Messenger.com

You are going to the website of the popular social media platform which is the Messenger.

5. Sign-in your Messenger Account

You need to put your personal account in here. As what you are using on the App or you can use different account as your choice. Very easy!


After you log in, you might see something quite like this... And it means, you're ready to send the files!

6. Look for the Send Photo Icon 

This is similar on the Facebook site as you use on the computer. Just click it after you find it.

7. Click the Document tab.

This option might be different depending on what phone you are using.

8. Locate the files you are trying to send

Again, this features might be different on your phone, but regardless, just look for the files you are trying to send.. (Tip: Before attempting this tutorial, ready your files on the folder that is very easy to find.)

9. Send the File

After you locate the file you want, you can see this on the message area. You can now send it.


And there you have it! No need for you to be worry on sending files. Start using this technique and send your homework, activity, projects on time!

Please let me know if this blog helps you. Just comment in the comment section below. If you have any questions that you might think I know the answer, don't hesitate to comment down. 

There's a lot of ways on how to send files on Messenger through mobile phone. It is only for you to choose what is best for you.